Wednesday, 21 November 2012

Mash-Up Mani

Hello!

I recently bought Sephora by OPI's "Mash-Up" polish, which is part of their Glee collection. The description on the website said it was an opaque polish but it's actually quite sheer. Nevertheless, it was the base of my mani.


-I used four coats of "Mash-Up" to get an opaque finish. It's a duochrome which goes from greenish grey to rose, depending on the angle you look at it from.


-I applied two coat's of Revlon's "Stunning" to my ring finger and thumb, then used my dotting tool to apply dots of Kleancolour's "It Purple" to the tips.
-I used L.A. Girl Magnetic polish in "Attract" on the tips of my pinky and index nails in a diagonal manner. I intended to have magnetic patterned nails but the pattern didn't look the way I'd envisioned it so I used Kleancolour's "Pearl Silver" with my dotting tool to add dots along the diagonal line.
-For my middle finger, I used "It Purple" and "Pearl Silver" again. I first did three purple lines parallel to the length of my nail, starting a little bit away from the nail bed and continuing to the tip. I then added three thinner lines with the silver just inside the purple lines. After that, I added some silver and purple dots with my dotting tool.
-Top coat sealed the look.

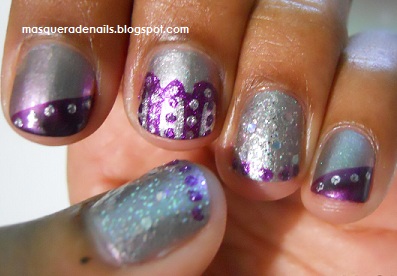

Tilted back to show the duochrome

Happy polishing!

Wednesday, 14 November 2012

Glittery Divali Mani

I hope you all had a lovely Divali. I did a simple mani since it was a busy day and I didn't have time to do anything elaborate. I also didn't have the time to stop and take pictures of each step so I must apologise for not having pictures of the mani without glitter, etc.


-My base colours were two coats of Sinful Colours' "Aquamarine" and two coats of Sephora by OPI's lovely dark purple polish with subtle magenta flecks called "Who's Spinning Tonight?"
-I painted two coats of Kleancolour's "Chunky Holo Bluebell" over the base colours.

-Both patterns came from Shany's SH20 plate. I used my Konad stamping set and black and white Konad stamping polishes to do the patterns.
-I painted another coat of "Chunky Holo Bluebell" over all my nails, and then added the odd fuchsia glitter dot here and there from Revlon's "Scandalous" polish.
Side note: I bought "Scandalous" just a few days ago and then saw Ashley from Spellbound Nails' post on Revlon's "Facets of Fuchsia polish," which looked exactly the same. Ashley did a little research and realised Revlon re-released "Facets of Fuchsia" as "Scandalous."
-I used top coat as usual to complete the mani.


Happy polishing!

Tuesday, 13 November 2012

Shubh Divali!


Happy Divali to all! May you have a happy and holy day!

Saturday, 10 November 2012

Divali Delicacies Mani

Hello!

As you may or may not know, Divali, the festival of lights will be celebrated next week (Tuesday in Trinidad). This is a very important and exciting festival for Hindus and non-Hindus alike and a lot of work goes into preparing for it.

I wasn't in the mood to do a mehndi pattern or deyas but I'm looking forward to Divali sweets so I did a mani based on that.


If you're unfamiliar with these foods, or if you're wondering how to make them, click the name of each sweet and you'll be taken to a recipe. Pictures are also included on the pages I've linked to, so you can see what they're supposed to look like.


Wednesday, 7 November 2012

Coral Disco Ball

Hello!

I was anxious to use the items I bought at the Caribbean Nail and Beauty Trade Show and this is what I came up with...

-After applying a base coat, I applied China Glaze's "High Hopes" polish. Coincidentally, I had high hopes for this one but I was very disappointed. The colour is a gorgeous coral but after two relatively thick coats, it still looked streaky (at least it looks smooth in the pictures). In addition to that, something was wrong with this particular bottle since every time I shook it, polish spilled all over the inside of the cap! As much as I love the colour, I don't think I'll be able to use this one again.
-I used FantaSea's diamond-shaped holo glitter pieces for my ring finger. I used a toothpick to pick up each piece of glitter and applied it to the nail while the CG polish was still wet. When the polish got too dry, I applied a tiny bit of clear top coat to the nail so the glitter would stick.
-I used clear top coat to seal the glitter in.


I love the effect of the glitter pieces. The camera doesn't capture the true beauty of this holo glitter disco ball. Doing this mani is a little time-consuming but the result is worth it.

Happy polishing!

Sunday, 4 November 2012

The Caribbean Nail & Beauty Trade Show Review

Hello!

The Caribbean Nail & Beauty Trade Show started today at the Centre of Excellence and it was well worth the traffic.

I found the event on Facebook and, having never heard of it before, wasn't sure what to expect. I was not disappointed as I found all sorts of nail art supplies at decent prices. However, I thought there could have been more makeup and other general beauty supplies and a better variety of brand names. It also would have been nice if the names and contact information/business cards of the companies had been displayed more prominently. The second and last day of the show is tomorrow from 10am to 8pm.

A special "thank you" goes out to my "not very girly" friend who waited ever so patiently without complaining while I inspected every item and debated on nail polish colours at each booth. Click the link below for the review.

Friday, 2 November 2012

Belated Halloween Manis

Hello!

Are you all sick of seeing Halloween manis? So am I but I didn't have time to post mine until now so I'm posting it anyway! I actually did two looks- one just for fun, and one that I actually wore to go out. Here's the first one I did...


-I first used Revlon's "Charming" as a base colour.
-I then used a cotton swab to "sponge" on Sinful Colours' "Sweet Treat," concentrating more of the colour at the tip of the nail and fading out. I put some of the polish on the skin around my nails, again concentrating it at my fingertips, just to get a more bloodied appearance.
-I used Sinful Colours' "Rich in Heart" in the same way, but this time I didn't go as far down the nail since I wanted some of the red polish to show through.
-A little black polish on the tips completed the gory look.


Doesn't look quite as authentic with the flash.
The second look, which I actually wore to go out, was a simple blood splatter mani. This was a very rushed mani since I started it an hour before I was meant to leave the house and I hadn't started getting dressed yet. The lack of cleanup was intentional...just kidding- I did the cleanup quite hurriedly in the car later on.


-I used Sinful Colours' "Snow White" as a base.
-Sinful Colours' "Sweet Treat" was the blood red. I mixed a little of the polish with some nail polish remover, dipped a straw into it and blew through the other end of the straw onto the nail. If you're doing this one, try to take a rest every so often to avoid getting lightheaded!

Happy polishing!

Wednesday, 24 October 2012

Halloween Mani

Hello again!

In my quest to use an untried polish, I came across Sinful Colours' "Cloud 9." It's a shimmery tangerine colour and since it's October, I immediately thought of doing a Halloween mani (even though Halloween isn't a big deal here and I've never actually seen anyone carve a pumpkin).


-I used Colour Club's "Wham! Pow!" as a base since "Cloud 9" is very sheer. I used one thick coat of it to maximise opacity.
-"Cloud 9" went on over the first coat of polish.


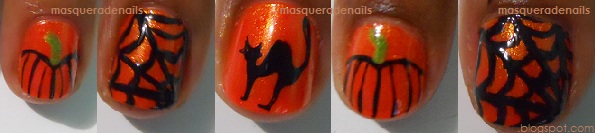
-I used an old black polish and a long striping brush to draw lines radiating from one corner outwards on my ring finger and thumb. After that, I added the small curved lines in between to create the spiderweb design.
-For my index and pinky fingers, I used the same brush and polish to draw pumpkins on half of each nail. Sinful Colours' "Happy Ending" was the perfect green to add the stems.
-I used Shany's SH02 plate and black Konad Special Polish with my Konad stamping set to stamp the cat image onto my middle finger.
-I took a photo without topcoat because I was afraid of smudging the designs with the topcoat brush.


-Then added topcoat.


Happy polishing!

Thursday, 18 October 2012

Green and Metallic with a Touch of Purple

Hello!

I recently went to the pharmacy to buy one item...In other words, I recently bought nail polish when I went to the pharmacy to buy something totally unrelated. I got Revlon's Top Speed polish in "Metallic" and their scented polish in "Mint Fizz," as well as Sally Hansen's Hard as Nails Xtreme Wear polish in "Green with Envy." The "Mint Fizz" polish does smell minty, besides the normal polish smell but I still would've been a tad disappointed if I'd bought it for the scent instead of the blue shimmery goodness. I was anxious to try "Metallic" and "Green with Envy" so I used both in a very quick and simple mani.


-I didn't bother to apply base coat today since I was in a hurry so application of these polishes was terrible! I used three coats of "Metallic" on my accent nail and two coats of "Green with Envy" on my other nails.


-I used a polish made right here in Trinidad to paint my design. It's "Purple Passion" by Arista. I used a long striping brush to paint curved "lines" on each nail, then used my dotting tool to paint dots below.


-It looked like it was missing something so I added smaller dots using a toothpick, and top coat smoothed the whole look out.


You'll be seeing quite a few dotticures here since it's one of my favourite ways of doing a mani.

Happy polishing!

Sunday, 14 October 2012

Salmon Nails

Hi there!

Ever had a mani turn out to be a literal representation of the colour? This one happened by accident. Only after I'd done it, I found the zebra nails looked like a piece of smoked salmon! Coincidentally (or perhaps as expected) the base colour was a salmon pink.

I did this mani before I started blogging so please excuse the extra crappy photos!
-I started with Unforgettable Moments' "Liquid Candy" over my usual base coat. I thought it was coral in the store, then thought it was bubblegum pink when I got home. I finally decided it can be any colour within that range, depending on the lighting. lol It tends to be more of a salmon but it photographs more bubblegum pink.
-I used Konad's m57 plate and white Konad special polish to stamp zebra (salmon?) patterns on my ring and index fingers. I used the same set to stamp the zebra pattern on half of my remaining nails in a diagonal fashion.
-The edges of the design on the nails without full zebra patterns looked scruffy so I used Kiss striping polish in "White" to draw a line at the edge of the design.
-I added turquoise hex glitter with a toothpick from Kleancolour's "Starry Blue" and finished with topcoat. Unfortunately I smudged some of the stamps with the topcoat. :(


Happy polishing!

LinkWithin

Related Posts Plugin for WordPress, Blogger...