Showing posts with label Kleancolour. Show all posts

Sunday, 16 December 2012

10 Day Holiday Nail Art Challenge Day 3: Gift wrap

Hello!

Here's my creation for Day 3 of the challenge.


This vintage wrapping paper inspired my look.


-I started with a white base of L.A. Colours' "Energy Source."
-I used an old gold polish to paint the background on, but it wasn't opaque enough so I went over it with Kleancolour's "Americano."
-I used my dotting tool and a smaller point to create dots of varying sizes using Sinful Colours' "Ruby Ruby" and "San Francisco."


Happy polishing!

Thursday, 13 December 2012

10 Day Holiday Nail Art Challenge Day 1: Silver and Gold

I've decided to participate in the 10 day Holiday Nail Art Challenge by datyorkLOVES and Delight In Nails.


I discovered the challenge via Fancy Phalanges about two hours ago so I hadn't planned anything. I therefore have an extremely simple mani for today's challenge.


Today's theme is "Silver and Gold." I used two coats of Kleancolour's "Pearl Silver" as the base and used gold striping tape to create a very simple design on two accent nails.


Happy polishing!

Wednesday, 12 December 2012

Christmas Stamping Skittles

This is my second attempt at a Christmas mani. I did one earlier using Sinful Colours' "Snow Me White" as the base for the white nails but it never dried (even though I painted those nails last night and used quick dry drops!). I redid it and here's the result:


-I used two coats of China Glaze's "Salsa" for the red nails, two coats of L.A. Colours' "Energy Source" for the white nails and two coats of Kleancolour's "Metallic Green" for the one green nail.
-Snowman nails: The image came from Shany's SH01 plate and I used white Konad special polish with my Konad stamping set to apply it. I used a toothpick to apply Sinful Colours' "Snow Me White" as snow. The snowman's face wasn't transferred so I used a toothpick to dot some eyes and a nose on.
-Candy cane nails: The pattern was from Shany's SH23 plate and the colour was done using red Konad special polish, followed by a second stamp with the same pattern using Kleancolour's "Metallic Green." As you can see, the red stamp wasn't very clean. I had the same problem the last time I used the red polish.
-Snowflake nail: The image came from Shany's SH17 plate and I used white Konad special polish again to apply the stamp.


Happy polishing!

Sunday, 9 December 2012

Jewel Tones

It's been said that Kleancolour's metallics are good for stamping. I decided to test that out myself.


-I applied base coat, followed by two coats of Jordana's "Purple Punch."


-I applied one coat of NK's "Turquoise" over the purple polish on my pinky, middle and thumb nails.


-I used Shany's SH25 plate with my Konad stamping set to stamp the pattern on with Kleancolour's "Copper." The polish stamped beautifully- it was opaque and true to the colour in the bottle.


I'll definitely be stamping with Kleancolour metallics again.
Happy polishing!

P.S. I'd also like to say a special hello to my glitter eyeliner-loving friend who is very supportive of my blog!

Wednesday, 28 November 2012

Needle Drag Mani

Hello!

I was inspired by this picture to do a needle drag mani. I modified it a little to make it my own version of a needle drag/swirly marbled mani.


-I used NK Nail Enamel in "Crystal Clear" as my base coat, then applied two coats of Kleancolour's "Retro Green" polish. It only needed one coat to be opaque but I added a second coat so my nail wouldn't show through if the needle scraped the top layer of polish off.
-I applied blobs of the other colours randomly over my nails. This step has to be done fairly quickly so the polish will stay wet enough to marble nicely without turning into clumps so I recommend doing one nail at a time. The colours used are Colour Club's "Emerald Depths," Sinful Colours' "Love Nails" and "Let's Talk," a polish by N.Y.C. which no longer has a label (a pale shimmery blue) and a few dots of Jordana's "Yellow Energy."
-I used a pin to drag and swirl the colours together. I used the side of the pin more than the tip itself, and at some points I mixed the colours together rather than just swirling them in sharper lines.
-About a minute after finishing, I gently pressed on the nails with my fingers to try to flatten the peaks that had formed during the needle drag.
-I applied top coat to smooth the look out. I didn't wait long enough for all the polish to dry so there are bubbles in the top coat. The next time I do this, I'll also add a second coat of top coat since one wasn't enough to smooth it out properly.


Happy polishing!

Wednesday, 21 November 2012

Mash-Up Mani

Hello!

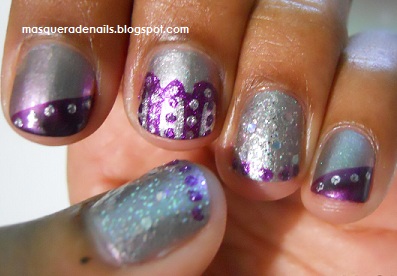
I recently bought Sephora by OPI's "Mash-Up" polish, which is part of their Glee collection. The description on the website said it was an opaque polish but it's actually quite sheer. Nevertheless, it was the base of my mani.


-I used four coats of "Mash-Up" to get an opaque finish. It's a duochrome which goes from greenish grey to rose, depending on the angle you look at it from.


-I applied two coat's of Revlon's "Stunning" to my ring finger and thumb, then used my dotting tool to apply dots of Kleancolour's "It Purple" to the tips.
-I used L.A. Girl Magnetic polish in "Attract" on the tips of my pinky and index nails in a diagonal manner. I intended to have magnetic patterned nails but the pattern didn't look the way I'd envisioned it so I used Kleancolour's "Pearl Silver" with my dotting tool to add dots along the diagonal line.
-For my middle finger, I used "It Purple" and "Pearl Silver" again. I first did three purple lines parallel to the length of my nail, starting a little bit away from the nail bed and continuing to the tip. I then added three thinner lines with the silver just inside the purple lines. After that, I added some silver and purple dots with my dotting tool.
-Top coat sealed the look.


Tilted back to show the duochrome

Happy polishing!

Wednesday, 14 November 2012

Glittery Divali Mani

I hope you all had a lovely Divali. I did a simple mani since it was a busy day and I didn't have time to do anything elaborate. I also didn't have the time to stop and take pictures of each step so I must apologise for not having pictures of the mani without glitter, etc.


-My base colours were two coats of Sinful Colours' "Aquamarine" and two coats of Sephora by OPI's lovely dark purple polish with subtle magenta flecks called "Who's Spinning Tonight?"
-I painted two coats of Kleancolour's "Chunky Holo Bluebell" over the base colours.

-Both patterns came from Shany's SH20 plate. I used my Konad stamping set and black and white Konad stamping polishes to do the patterns.
-I painted another coat of "Chunky Holo Bluebell" over all my nails, and then added the odd fuchsia glitter dot here and there from Revlon's "Scandalous" polish.
Side note: I bought "Scandalous" just a few days ago and then saw Ashley from Spellbound Nails' post on Revlon's "Facets of Fuchsia polish," which looked exactly the same. Ashley did a little research and realised Revlon re-released "Facets of Fuchsia" as "Scandalous."
-I used top coat as usual to complete the mani.


Happy polishing!

Sunday, 14 October 2012

Salmon Nails

Hi there!

Ever had a mani turn out to be a literal representation of the colour? This one happened by accident. Only after I'd done it, I found the zebra nails looked like a piece of smoked salmon! Coincidentally (or perhaps as expected) the base colour was a salmon pink.

I did this mani before I started blogging so please excuse the extra crappy photos!
-I started with Unforgettable Moments' "Liquid Candy" over my usual base coat. I thought it was coral in the store, then thought it was bubblegum pink when I got home. I finally decided it can be any colour within that range, depending on the lighting. lol It tends to be more of a salmon but it photographs more bubblegum pink.
-I used Konad's m57 plate and white Konad special polish to stamp zebra (salmon?) patterns on my ring and index fingers. I used the same set to stamp the zebra pattern on half of my remaining nails in a diagonal fashion.
-The edges of the design on the nails without full zebra patterns looked scruffy so I used Kiss striping polish in "White" to draw a line at the edge of the design.
-I added turquoise hex glitter with a toothpick from Kleancolour's "Starry Blue" and finished with topcoat. Unfortunately I smudged some of the stamps with the topcoat. :(


Happy polishing!

Wednesday, 10 October 2012

Aquamarine Hot Spot mani

Hello there! Today's look is very basic but the colours are so beautiful that nail art is not needed.


-I applied base coat, then applied Sinful Colours' "Aquamarine" and "Hot Spot" on alternating fingers.
-Once they had dried, I applied a second coat of each. At this point the colours already looked gorgeous together and I debated whether or not I should bother adding glitter at all.


-I went ahead and added Icing's "Epic Winning" to the "Aquamarine" nails. It was a win since it's a pretty holo glitter, but I'm still not sure if I like the mani better with or without the glitter.
-I applied Kleancolour's "Chunky Holo Bluebell" to the "Hot Spot" nails, thinking it would look great on a dark background. However, it was very muted and the holo properties didn't show up as much as I'd have liked, so I applied "Epic Winning" over it.
-I applied clear top coat to all my nails.

(Yes, this is the same picture as at the beginning of the post!)

Unfortunately, the day after I did this mani, I decided to try my first frankenpolish. I know I should've waited until I was in between manis but I was so anxious to try it, that I went right ahead with the hot pink polish. Of course I got a nice pink smudge right on one of my newly painted nails!


I was sad to remove this one. I'll probably be repeating it some other time (without the glitter). One thing to note is that "Aquamarine" stained my nails a bit, but the stain went away after a few washes. Hope it works out better for the rest of you :)

Happy polishing!

LinkWithin

Related Posts Plugin for WordPress, Blogger...