Showing posts with label Revlon. Show all posts

Wednesday, 21 November 2012

Mash-Up Mani

Hello!

I recently bought Sephora by OPI's "Mash-Up" polish, which is part of their Glee collection. The description on the website said it was an opaque polish but it's actually quite sheer. Nevertheless, it was the base of my mani.


-I used four coats of "Mash-Up" to get an opaque finish. It's a duochrome which goes from greenish grey to rose, depending on the angle you look at it from.


-I applied two coat's of Revlon's "Stunning" to my ring finger and thumb, then used my dotting tool to apply dots of Kleancolour's "It Purple" to the tips.
-I used L.A. Girl Magnetic polish in "Attract" on the tips of my pinky and index nails in a diagonal manner. I intended to have magnetic patterned nails but the pattern didn't look the way I'd envisioned it so I used Kleancolour's "Pearl Silver" with my dotting tool to add dots along the diagonal line.
-For my middle finger, I used "It Purple" and "Pearl Silver" again. I first did three purple lines parallel to the length of my nail, starting a little bit away from the nail bed and continuing to the tip. I then added three thinner lines with the silver just inside the purple lines. After that, I added some silver and purple dots with my dotting tool.
-Top coat sealed the look.

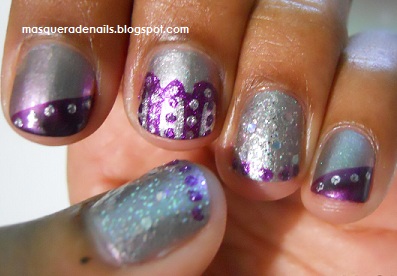

Tilted back to show the duochrome

Happy polishing!

Wednesday, 14 November 2012

Glittery Divali Mani

I hope you all had a lovely Divali. I did a simple mani since it was a busy day and I didn't have time to do anything elaborate. I also didn't have the time to stop and take pictures of each step so I must apologise for not having pictures of the mani without glitter, etc.


-My base colours were two coats of Sinful Colours' "Aquamarine" and two coats of Sephora by OPI's lovely dark purple polish with subtle magenta flecks called "Who's Spinning Tonight?"
-I painted two coats of Kleancolour's "Chunky Holo Bluebell" over the base colours.

-Both patterns came from Shany's SH20 plate. I used my Konad stamping set and black and white Konad stamping polishes to do the patterns.
-I painted another coat of "Chunky Holo Bluebell" over all my nails, and then added the odd fuchsia glitter dot here and there from Revlon's "Scandalous" polish.
Side note: I bought "Scandalous" just a few days ago and then saw Ashley from Spellbound Nails' post on Revlon's "Facets of Fuchsia polish," which looked exactly the same. Ashley did a little research and realised Revlon re-released "Facets of Fuchsia" as "Scandalous."
-I used top coat as usual to complete the mani.


Happy polishing!

Thursday, 18 October 2012

Green and Metallic with a Touch of Purple

Hello!

I recently went to the pharmacy to buy one item...In other words, I recently bought nail polish when I went to the pharmacy to buy something totally unrelated. I got Revlon's Top Speed polish in "Metallic" and their scented polish in "Mint Fizz," as well as Sally Hansen's Hard as Nails Xtreme Wear polish in "Green with Envy." The "Mint Fizz" polish does smell minty, besides the normal polish smell but I still would've been a tad disappointed if I'd bought it for the scent instead of the blue shimmery goodness. I was anxious to try "Metallic" and "Green with Envy" so I used both in a very quick and simple mani.


-I didn't bother to apply base coat today since I was in a hurry so application of these polishes was terrible! I used three coats of "Metallic" on my accent nail and two coats of "Green with Envy" on my other nails.


-I used a polish made right here in Trinidad to paint my design. It's "Purple Passion" by Arista. I used a long striping brush to paint curved "lines" on each nail, then used my dotting tool to paint dots below.


-It looked like it was missing something so I added smaller dots using a toothpick, and top coat smoothed the whole look out.


You'll be seeing quite a few dotticures here since it's one of my favourite ways of doing a mani.

Happy polishing!

Sunday, 7 October 2012

Polka dots on pink

Hi there! I must apologise for my prolonged absence from the blogging world. I've been extremely busy and haven't had enough free time to finish a blog post. Good news- I'm back now, bearing a cute pink polka dotted mani!


-After the usual base coat, I applied Nabi's "Baby Pink" polish. 
-I used Revlon's Super Top Speed polish in "Shazam" on half of the nail, applied in a diagonal fashion. This is a really pretty glittery pink polish which dries quickly. I used two coats to get to the level of glitterbomb I was looking for.
-I painted a black line separating glitter from creme with Kiss striping polish in Pearl Black. It actually has a blue shimmer, but plain black would be better for this look.


-The mani was looking cute (apart from the messy cuticles- excuse the lack of cleanup before the pics were taken!) but I felt it could use a little extra something....so I used a dotting tool and plain black polish to add polka dots, then finished with top coat.


I think the polka dots did a lot to spruce it up and increase the cuteness factor. What do you think?

Happy polishing!

Monday, 24 September 2012

Welcome!

Hello and welcome to my very first blog post! I've been meaning to do a nail polish/beauty blog for quite a while so I'm happy to finally be doing it. I hope you all enjoy my posts as much as I know I'll enjoy creating them. I'll be posting pictures of my nail art, as well as reviews of different beauty products I've used. My theme tends to be less chatter, more polish, so here we go!...

This is a tape and plastic wrap mani I did a few weeks ago. Scroll down to read instructions on how you can recreate this look yourself, and remember to let me know how it went!


- I first painted my nails with a clear base coat, followed by two coats of Revlon nail polish in "Dreamer."
- Once that was totally dry, I cut strips of Sellotape of varying thickness and stuck them onto my nails.
- I applied dots of polish in different colours to the exposed strips, then crumpled some plastic wrap and pressed it to my nails to blend the colours together. This step has to be done quickly, before the polish sets, otherwise the plastic wrap will remove the colours in ugly clumps instead of nicely blending them together. The colours I used were Sinful Colours nail polishes in "Rise and Shine," "Oasis" and "Aquamarine."
- I used Sinful Colours "Let's Meet" to fill in the spaces. "Let's Meet" is a lovely shimmery yellow polish which brightened the whole mani up.
- I finished with Sally Hansen Hard as Nails Xtreme Wear top coat in "Invisible," using a generous amount of polish and light strokes to avoid smudging the design.

L-R: Dreamer, Rise and Shine, Oasis, Aquamarine, Let's Meet

This fun design was relatively simple but looked as though it took hours to do! Feedback is welcome so please post your comments.

Happy polishing!

LinkWithin

Related Posts Plugin for WordPress, Blogger...