Showing posts with label metallic. Show all posts

Saturday, 5 January 2013

Linear Needle Drag


Here's another needle drag mani, which probably won't be the last.


-I started with base coat and two coats of Sinful Colours' "Aquamarine." This polish stains so base coat is a must!
-I painted vertical stripes of Sinful Colours' "Let's Talk" and Sephora by O.P.I's "Mash-Up" onto one accent nail, then used a pin to drag horizontal lines through the polish.
-I repeated the needle drag on a second accent nail.
-Top coat was applied as usual.


Happy polishing!

Sunday, 16 December 2012

10 Day Holiday Nail Art Challenge Day 3: Gift wrap

Hello!

Here's my creation for Day 3 of the challenge.


This vintage wrapping paper inspired my look.


-I started with a white base of L.A. Colours' "Energy Source."
-I used an old gold polish to paint the background on, but it wasn't opaque enough so I went over it with Kleancolour's "Americano."
-I used my dotting tool and a smaller point to create dots of varying sizes using Sinful Colours' "Ruby Ruby" and "San Francisco."


Happy polishing!

Thursday, 13 December 2012

10 Day Holiday Nail Art Challenge Day 1: Silver and Gold

I've decided to participate in the 10 day Holiday Nail Art Challenge by datyorkLOVES and Delight In Nails.


I discovered the challenge via Fancy Phalanges about two hours ago so I hadn't planned anything. I therefore have an extremely simple mani for today's challenge.


Today's theme is "Silver and Gold." I used two coats of Kleancolour's "Pearl Silver" as the base and used gold striping tape to create a very simple design on two accent nails.


Happy polishing!

Wednesday, 12 December 2012

Christmas Stamping Skittles

This is my second attempt at a Christmas mani. I did one earlier using Sinful Colours' "Snow Me White" as the base for the white nails but it never dried (even though I painted those nails last night and used quick dry drops!). I redid it and here's the result:


-I used two coats of China Glaze's "Salsa" for the red nails, two coats of L.A. Colours' "Energy Source" for the white nails and two coats of Kleancolour's "Metallic Green" for the one green nail.
-Snowman nails: The image came from Shany's SH01 plate and I used white Konad special polish with my Konad stamping set to apply it. I used a toothpick to apply Sinful Colours' "Snow Me White" as snow. The snowman's face wasn't transferred so I used a toothpick to dot some eyes and a nose on.
-Candy cane nails: The pattern was from Shany's SH23 plate and the colour was done using red Konad special polish, followed by a second stamp with the same pattern using Kleancolour's "Metallic Green." As you can see, the red stamp wasn't very clean. I had the same problem the last time I used the red polish.
-Snowflake nail: The image came from Shany's SH17 plate and I used white Konad special polish again to apply the stamp.


Happy polishing!

Sunday, 9 December 2012

Jewel Tones

It's been said that Kleancolour's metallics are good for stamping. I decided to test that out myself.


-I applied base coat, followed by two coats of Jordana's "Purple Punch."


-I applied one coat of NK's "Turquoise" over the purple polish on my pinky, middle and thumb nails.


-I used Shany's SH25 plate with my Konad stamping set to stamp the pattern on with Kleancolour's "Copper." The polish stamped beautifully- it was opaque and true to the colour in the bottle.


I'll definitely be stamping with Kleancolour metallics again.
Happy polishing!

P.S. I'd also like to say a special hello to my glitter eyeliner-loving friend who is very supportive of my blog!

Wednesday, 21 November 2012

Mash-Up Mani

Hello!

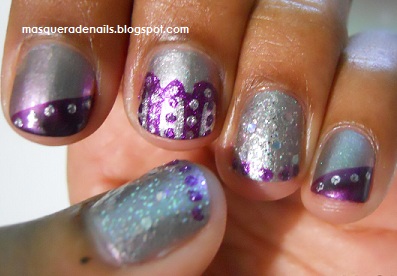
I recently bought Sephora by OPI's "Mash-Up" polish, which is part of their Glee collection. The description on the website said it was an opaque polish but it's actually quite sheer. Nevertheless, it was the base of my mani.


-I used four coats of "Mash-Up" to get an opaque finish. It's a duochrome which goes from greenish grey to rose, depending on the angle you look at it from.


-I applied two coat's of Revlon's "Stunning" to my ring finger and thumb, then used my dotting tool to apply dots of Kleancolour's "It Purple" to the tips.
-I used L.A. Girl Magnetic polish in "Attract" on the tips of my pinky and index nails in a diagonal manner. I intended to have magnetic patterned nails but the pattern didn't look the way I'd envisioned it so I used Kleancolour's "Pearl Silver" with my dotting tool to add dots along the diagonal line.
-For my middle finger, I used "It Purple" and "Pearl Silver" again. I first did three purple lines parallel to the length of my nail, starting a little bit away from the nail bed and continuing to the tip. I then added three thinner lines with the silver just inside the purple lines. After that, I added some silver and purple dots with my dotting tool.
-Top coat sealed the look.


Tilted back to show the duochrome

Happy polishing!

Thursday, 18 October 2012

Green and Metallic with a Touch of Purple

Hello!

I recently went to the pharmacy to buy one item...In other words, I recently bought nail polish when I went to the pharmacy to buy something totally unrelated. I got Revlon's Top Speed polish in "Metallic" and their scented polish in "Mint Fizz," as well as Sally Hansen's Hard as Nails Xtreme Wear polish in "Green with Envy." The "Mint Fizz" polish does smell minty, besides the normal polish smell but I still would've been a tad disappointed if I'd bought it for the scent instead of the blue shimmery goodness. I was anxious to try "Metallic" and "Green with Envy" so I used both in a very quick and simple mani.


-I didn't bother to apply base coat today since I was in a hurry so application of these polishes was terrible! I used three coats of "Metallic" on my accent nail and two coats of "Green with Envy" on my other nails.


-I used a polish made right here in Trinidad to paint my design. It's "Purple Passion" by Arista. I used a long striping brush to paint curved "lines" on each nail, then used my dotting tool to paint dots below.


-It looked like it was missing something so I added smaller dots using a toothpick, and top coat smoothed the whole look out.


You'll be seeing quite a few dotticures here since it's one of my favourite ways of doing a mani.

Happy polishing!

LinkWithin

Related Posts Plugin for WordPress, Blogger...