Showing posts with label purple. Show all posts

Saturday, 5 January 2013

Linear Needle Drag


Here's another needle drag mani, which probably won't be the last.


-I started with base coat and two coats of Sinful Colours' "Aquamarine." This polish stains so base coat is a must!
-I painted vertical stripes of Sinful Colours' "Let's Talk" and Sephora by O.P.I's "Mash-Up" onto one accent nail, then used a pin to drag horizontal lines through the polish.
-I repeated the needle drag on a second accent nail.
-Top coat was applied as usual.


Happy polishing!

Sunday, 30 December 2012

Tinsel Town Mani

Hello!

I've been away from the blogging world for a while, thanks to the holidays. I've been way too busy to do any blog posts. I've done a simple one today, mostly for the sake of having something to post.


-The base colour was done with two coats of China Glaze's "Spontaneous."
-I added "Hollywood If I Could" by Sephora by O.P.I.


Happy polishing!

Sunday, 9 December 2012

Jewel Tones

It's been said that Kleancolour's metallics are good for stamping. I decided to test that out myself.


-I applied base coat, followed by two coats of Jordana's "Purple Punch."


-I applied one coat of NK's "Turquoise" over the purple polish on my pinky, middle and thumb nails.


-I used Shany's SH25 plate with my Konad stamping set to stamp the pattern on with Kleancolour's "Copper." The polish stamped beautifully- it was opaque and true to the colour in the bottle.


I'll definitely be stamping with Kleancolour metallics again.
Happy polishing!

P.S. I'd also like to say a special hello to my glitter eyeliner-loving friend who is very supportive of my blog!

Wednesday, 28 November 2012

Needle Drag Mani

Hello!

I was inspired by this picture to do a needle drag mani. I modified it a little to make it my own version of a needle drag/swirly marbled mani.


-I used NK Nail Enamel in "Crystal Clear" as my base coat, then applied two coats of Kleancolour's "Retro Green" polish. It only needed one coat to be opaque but I added a second coat so my nail wouldn't show through if the needle scraped the top layer of polish off.
-I applied blobs of the other colours randomly over my nails. This step has to be done fairly quickly so the polish will stay wet enough to marble nicely without turning into clumps so I recommend doing one nail at a time. The colours used are Colour Club's "Emerald Depths," Sinful Colours' "Love Nails" and "Let's Talk," a polish by N.Y.C. which no longer has a label (a pale shimmery blue) and a few dots of Jordana's "Yellow Energy."
-I used a pin to drag and swirl the colours together. I used the side of the pin more than the tip itself, and at some points I mixed the colours together rather than just swirling them in sharper lines.
-About a minute after finishing, I gently pressed on the nails with my fingers to try to flatten the peaks that had formed during the needle drag.
-I applied top coat to smooth the look out. I didn't wait long enough for all the polish to dry so there are bubbles in the top coat. The next time I do this, I'll also add a second coat of top coat since one wasn't enough to smooth it out properly.


Happy polishing!

Wednesday, 21 November 2012

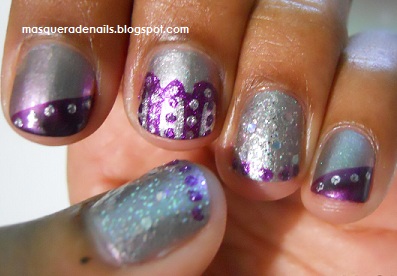
Mash-Up Mani

Hello!

I recently bought Sephora by OPI's "Mash-Up" polish, which is part of their Glee collection. The description on the website said it was an opaque polish but it's actually quite sheer. Nevertheless, it was the base of my mani.


-I used four coats of "Mash-Up" to get an opaque finish. It's a duochrome which goes from greenish grey to rose, depending on the angle you look at it from.


-I applied two coat's of Revlon's "Stunning" to my ring finger and thumb, then used my dotting tool to apply dots of Kleancolour's "It Purple" to the tips.
-I used L.A. Girl Magnetic polish in "Attract" on the tips of my pinky and index nails in a diagonal manner. I intended to have magnetic patterned nails but the pattern didn't look the way I'd envisioned it so I used Kleancolour's "Pearl Silver" with my dotting tool to add dots along the diagonal line.
-For my middle finger, I used "It Purple" and "Pearl Silver" again. I first did three purple lines parallel to the length of my nail, starting a little bit away from the nail bed and continuing to the tip. I then added three thinner lines with the silver just inside the purple lines. After that, I added some silver and purple dots with my dotting tool.
-Top coat sealed the look.


Tilted back to show the duochrome

Happy polishing!

Wednesday, 14 November 2012

Glittery Divali Mani

I hope you all had a lovely Divali. I did a simple mani since it was a busy day and I didn't have time to do anything elaborate. I also didn't have the time to stop and take pictures of each step so I must apologise for not having pictures of the mani without glitter, etc.


-My base colours were two coats of Sinful Colours' "Aquamarine" and two coats of Sephora by OPI's lovely dark purple polish with subtle magenta flecks called "Who's Spinning Tonight?"
-I painted two coats of Kleancolour's "Chunky Holo Bluebell" over the base colours.

-Both patterns came from Shany's SH20 plate. I used my Konad stamping set and black and white Konad stamping polishes to do the patterns.
-I painted another coat of "Chunky Holo Bluebell" over all my nails, and then added the odd fuchsia glitter dot here and there from Revlon's "Scandalous" polish.
Side note: I bought "Scandalous" just a few days ago and then saw Ashley from Spellbound Nails' post on Revlon's "Facets of Fuchsia polish," which looked exactly the same. Ashley did a little research and realised Revlon re-released "Facets of Fuchsia" as "Scandalous."
-I used top coat as usual to complete the mani.


Happy polishing!

LinkWithin

Related Posts Plugin for WordPress, Blogger...